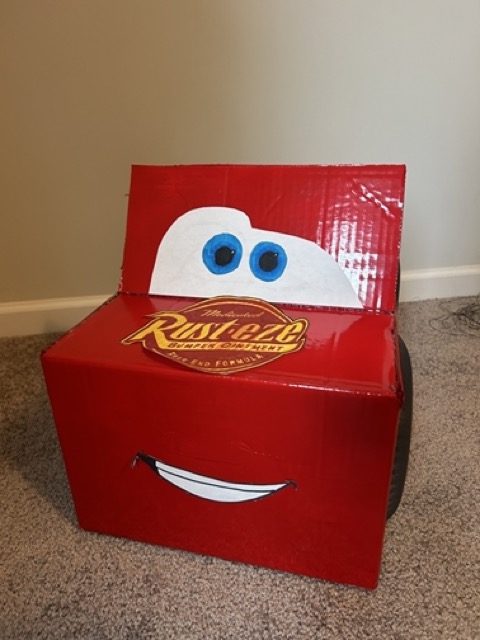
One of my toddler’s favorite indoor activities is literally sitting in a cardboard diaper box. Sometimes he just likes to sit in it, but sometimes we will push him around in the box on the carpet. It’s physically exhausting, but a lot of fun! I had the idea to turn a cardboard box into a DIY Lightning McQueen (he is OBSESSED with Disney Cars lately), and this ended up being such a fun craft to do.

How to Make a DIY Lightning McQueen Out of a Box
This reel I made, explains how to do it best! But you will likely have to modify a bit based on the box you use.

I used a a Costco diaper box for this DIY Lightning McQueen, but you could use any cardboard box that can hold your kid!

- Cut off the wide flaps from the box using scissors or an exacto knife. Keep one of the flaps you cut off for later.
- I also used scissors to cut one of the more narrow flaps on the back in half width-wise (this is to make the “spoiler).
- Cut one of the discarded flaps so that it was the same width as the front flap.
- Spray paint red the box and the additional piece of cardboard.
- Spray paint 4 paper plates black.
- Once all the paint is dry, I used a hot glue gun to glue the edges of the front flap to the inside of the box so that it creates the “hood” of the car. I then hot glue to attach that additional piece of cardboard to the edge of the front flap to create the eyes/windshield
- Hot glue the wheels onto the sides of the car.
- I printed Lightning McQueen’s Rust-Eze logo and his number and free-handed some eyes and mouth on some regular paper, then glued everything on.

My toddler absolutely loves his cardboard Lightning McQueen, and I’ll probably have to pull it out for his Cars themed birthday party coming up!
If you’re looking for more fun indoor toddler activities, check out this post about 13 indoor activities!
This post may contain affiliate links. Please see policy page for more information.
Leave a Reply